Requirements:
- Google Plugin for Eclipse
- JBoss Tools RichFaces
- Apache Maven
- Apache MyFaces Core 2.0
- Apache Xalan-J 2.7
- Unified Expression Language API
- Unified Expression Language Implementation
- JBoss RichFaces 4.0
- JBoss RichFaces 4.0 Component Development Kit
- SAC - Simple API for CSS
- CSS Parser
- Guava
1. At first we need Maven to build the RichFaces sample project for GAE. But before we do it, the JBoss valid repository has to be added to our Maven configuration. The sample of the settings.xml file can be downloaded from here.
2. The project is being built from the special archetypes called richfaces-archetype-gae. All these archetypes can be found on this Nexus website. The following command gets the maven sample project for the RichFaces 4.0 Final:
mvn archetype:generate -DarchetypeGroupId=org.richfaces.archetypes -DarchetypeArtifactId=richfaces-archetype-gae -DarchetypeVersion=4.0.0.Final -DgroupId=[put your group id here] -DartifactId=[put your artifact id here] -Dversion=1.0
The default target of the project is Java 1.5. It is recommended to change this (in the pom.xml file) to 1.6.
In the project folder, the next command can build the sample app:
mvn clean install
We have used the maven to build the sample app, because that way we can get some files which will be required by the RichFaces projects in Eclipse. Especially the static CSS skins for the RichFaces: the static-resource-mappings.properties file and the static-resources folder which includes the necessary files.
We will import the folders and files to the adequate folders of our Eclipse projects. We can use also other sample files from the maven project, like jsp and xhtml files or templates.
3. Our first step in the Eclipse environment should be the installation (if we don't have them yet) of the plugins - the Google Plugin and JBoss Tools RichFaces plugin.
4. If we have them already installed, we may start the New Project -> Google Web Application. We won't use Google Web Toolkit, so we uncheck it in the wizard.
5. For use of the JSF tools of the Eclipse, we should add JSF capabilities to our project. Right click and choose Configure -> Add JSF Capabilities. In the wizard choose any web app runtime, but after that in the project Properties uncheck it (in the Targeted Runtimes), because instead we will use the Google App Engine.
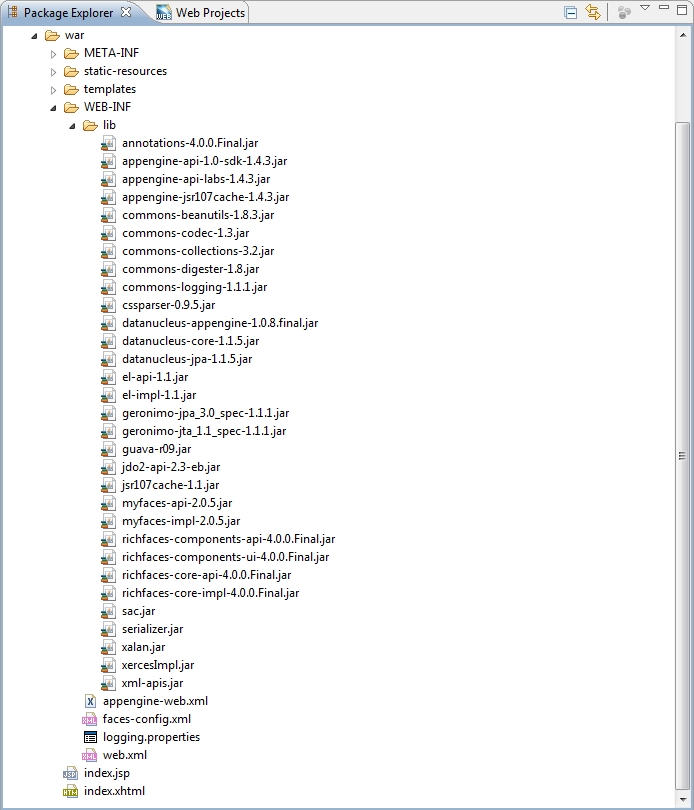
6. Now we have to import (Import -> General -> File System) all the missing dependencies (folders and files) to the project's war folder. It means Apache MyFaces Core, Apache Xalan-J, Unified Expression Language libraries, JBoss RichFaces libraries, JBoss RichFaces CDK's annotations library (optional, available after the maven compilation of the CDK), the SAC library, the CSS parser, Guava and the files which we get in the 2. step.
The sample list of the project dependency files is shown below:
7. To make the draft of the project complete, we have to take care of the configuration files as well - web.xml, appengine-web.xml and the faces-config.xml. You can download the working sample files here:
And Voilà!
If we have done all the necessary steps, the Eclipse/RichFaces/GAE web app will run (Run As -> Web Application).
If you need any extra, paid or free, consultancy do not hesitate to ask. Any creative, constructive comments/feedbacks/fixes are also very welcome. :-)
Tomek
Documents which have been very helpful:
- Configuring JavaServer Faces 2.0 to run on the Google App Engine Using Eclipse
- JavaServer Faces 2.0 and Google App Engine Compatibility Issues
- Google App Engine for Java Questions
- WillItPlayInJava
- Tutorial: Configuring MyFaces 2 to run on Google App Engine with Eclipse
- How to use RichFaces 4.0 with Google App Engine
No comments:
Post a Comment